Two ways to create, one menu
When you click the Create menu in Photoshop Elements 2026, you see two distinct sections — and understanding the difference between them will save you a lot of confusion.
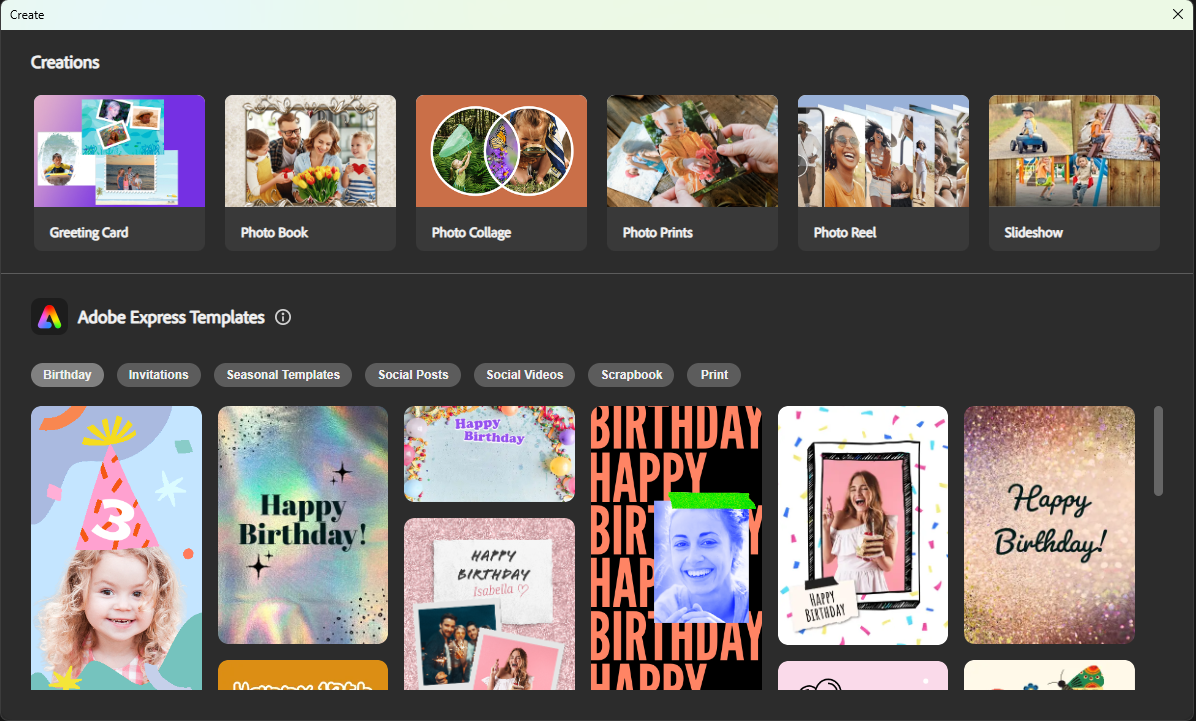
The top section is called Creations. This is where PSE's own built-in project tools live: Greeting Card, Photo Book, Photo Collage, Photo Prints, Photo Reel, and Slideshow. Everything here opens and runs entirely inside Photoshop Elements itself.
Below that is the Adobe Express Templates section — marked with the Adobe Express logo and a small info button. This is a completely different experience. The templates you see here are hosted by Adobe Express. When you click one, your browser opens with that template already loaded and ready to edit. All the design work happens in the browser, not inside PSE.
No Adobe account login is required. The template opens straight away, and you can start editing immediately.
This post is about the Adobe Express Templates section — what it contains, exactly how the browser handoff works, and how to go from browsing to a finished design you can share or print.
What the Express template library contains
The Adobe Express Templates section is organised into seven filter tabs, exactly as you see them in the menu:
- Birthday — cards, invitations, and social posts for all ages and milestone celebrations
- Invitations — party invites, announcements, and event notices
- Seasonal Templates — Christmas, Thanksgiving, Easter, summer, autumn, and other seasonal designs
- Social Posts — correctly sized layouts for Instagram, Facebook, and Pinterest
- Social Videos — short animated posts and looping video templates
- Scrapbook — decorated page layouts with backgrounds, borders, and embellishments
- Print — bookmarks, labels, stickers, and small printable projects
Each tab shows a scrollable grid of template thumbnails. There are dozens to hundreds of options in each category.
Exactly how the handoff to the browser works
- 1Open Photoshop Elements and click the Create menu.
- 2In the Adobe Express Templates section at the bottom, click any of the filter tabs — Birthday, Invitations, Seasonal Templates, Social Posts, Social Videos, Scrapbook, or Print.
- 3Browse the template thumbnails and click the one you want.
- 4Your default browser opens automatically with that template loaded in Adobe Express. This is the moment the handoff happens — from this point all editing takes place in the browser.
- 5No login is required. The template is ready to edit immediately.
- 6Swap in your photos, edit the text, adjust the colors — all in the browser.
- 7When you are happy with the result, download it from the browser as a JPEG, PNG, or PDF.
Photoshop Elements stays open in the background throughout. Once you have downloaded your finished design, you can bring it back into PSE for any further photo editing if needed.
Step-by-step: from Create menu to finished card
Step 1: Open Create and go to Adobe Express Templates
Click the Create menu. Scroll past the Creations row at the top. In the Adobe Express Templates section, click the tab that matches your project — Birthday for a birthday card, Seasonal Templates for a holiday greeting, Social Posts for something you want to share online.
Step 2: Choose a template
Browse the thumbnails. Choose based on layout rather than colors or photos — those are straightforward to change once you are in the browser. Ask yourself:
- Is the text positioned where I want it?
- Does the proportion match my output — square for Instagram, portrait for a printed invite?
- Does the overall feel fit the occasion — playful, warm, elegant?
Click a thumbnail when you find the right one. Your browser opens.
Step 3: Replace the photos in the browser
Most templates have photo placeholder areas. In Adobe Express in the browser:
- 1Click a photo placeholder in the template.
- 2Click Replace or the upload icon, then browse to a photo on your computer.
- 3Reposition and resize the photo inside its frame using the handles.
Repeat for every placeholder. A useful habit: select your photos first and keep them in a folder before you start browsing, so you can choose a template layout that matches the number and shape of photos you have.
Step 4: Edit the text
Click any text element to select it and type your own message. Change the font or size if the default does not suit the occasion. Keep it concise — templates are designed around a specific amount of text, and adding more than the placeholder usually pushes things out of alignment.
Step 5: Adjust colors if needed
Many templates offer a global theme color that shifts the whole design at once when you change it. Others require editing elements individually. Even a small change — swapping the background from pastel pink to a warm cream — can make the template feel genuinely personal.
Step 6: Download from the browser
- For sharing digitally — download as JPEG or PNG, then email it or upload to social media.
- For printing at home — download as a high-resolution JPEG or PDF.
- For a print service — download as PDF and send to an online lab or local print shop.
The difference between Creations and Express Templates
This is worth stating clearly because both sections live in the same menu and it is easy to mix them up.
| Creations (top row) | Adobe Express Templates (bottom) | |
|---|---|---|
| Where you work | Inside Photoshop Elements | In your browser |
| Examples | Greeting Card, Photo Book, Photo Collage, Slideshow | Birthday cards, Social posts, Scrapbook pages |
| Login needed | No | No |
| Design control | Full PSE toolset | Adobe Express browser tools |
| Best for | Projects where you want full photo editing control | Fast polished designs from a professional template |
Neither is better than the other — they suit different moments. If you are building a deeply personal scrapbook page and want full control over every element, the Creations tools inside PSE are the right choice. If you need a polished birthday invitation in fifteen minutes, Express Templates are faster.
When Express Templates save you the most time
You need something finished today. A card for tomorrow, a social post for this afternoon, an invite for next week. Templates get you to a polished result in under twenty minutes.
You want a series to look consistent. Use the same template with different photos for each grandchild's birthday card year after year. The consistent layout looks intentional.
You do not enjoy starting from a blank page. A template gives you a structure that already looks good. Many projects that would otherwise never get made actually get made because a template lowered the barrier to starting.
A good first project
If you have not used the Express Templates section yet, try this:
- 1Click Create → find the Adobe Express Templates section → click Birthday
- 2Scroll through the thumbnails and pick one that appeals to you
- 3Click it — your browser opens
- 4Swap in one family photo
- 5Change the greeting text to something personal
- 6Download as a JPEG
- 7Email it to someone who will appreciate it
That fifteen-minute experience will show you exactly how the PSE-to-browser handoff works, and you will have something real to show for it.